Keeping a screenshot current
In this tutorial you will publish a screenshot into a documentation page, change the application, and watch shotlist catch the screenshot going stale. You will finish with a command you can run in continuous integration that fails when your documentation shows something that is no longer true.
It continues in the project from Your first screenshot, with the order-row recipe working and its callouts section in place. Keep the application running at http://localhost:3000.
Step 1: choose where screenshots are published
So far every image has landed in screenshots/out/, which is a scratch folder. Ledger keeps the images its documentation uses in public/images/.
Before you continue, visit the Documentation page at http://localhost:3000/docs.html and see what it looks like.
Name public/images as a destination:
site:
  url: http://localhost:3000
  serve: npm run dev

install:
  docs: public/images
docs is a name you invented; public/images is the folder it points at. A real project usually has two or three, one per place that shows screenshots.
Now point the recipe at it. Add one line under name:
name: order-row
install: docs
Step 2: publish the screenshot
npx shotlist order-row --installYou should see two lines:
  ✓ order-row → screenshots/out/order-row.png
    installed public/images/order-row.png
Now open http://localhost:3000/docs.html. Where the page said no screenshot was there yet, your annotated order row is now sitting in the documentation, under the sentence it illustrates.
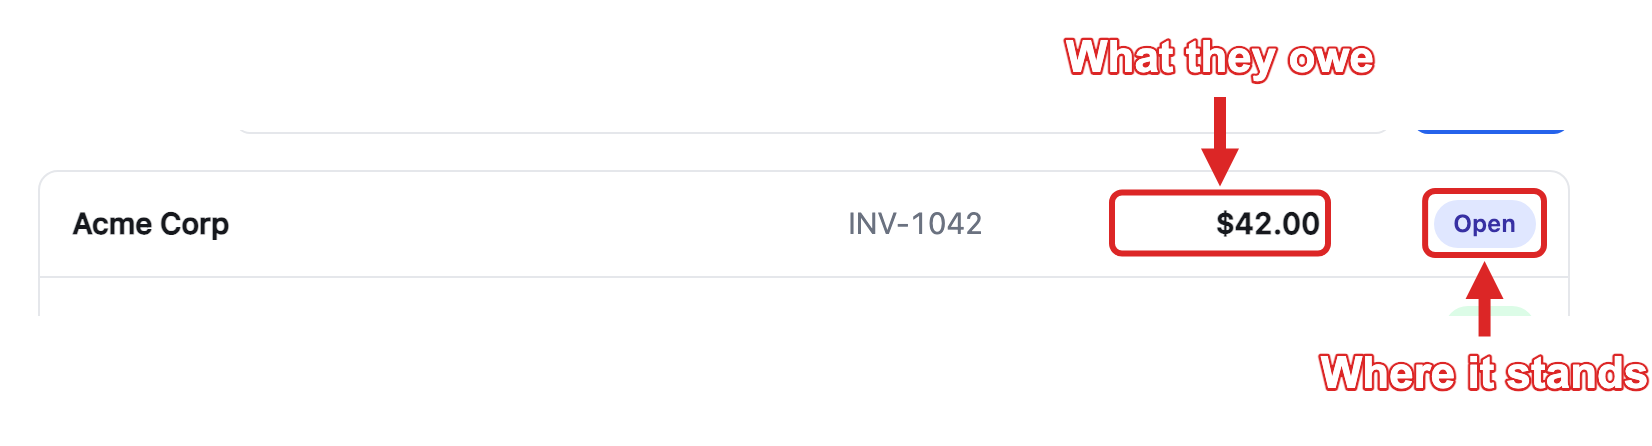
--check compares against. shotlist also wrote shotlist.baseline.json beside your configuration, recording the versions of shotlist, Playwright and Chromium that took the picture, and the operating system it ran on. In a real project you commit that alongside the images.
Step 3: check that the screenshot is still accurate
npx shotlist --checkThis re-takes every screenshot and compares each against the published copy. Nothing has changed, so you should see:
same order-rowThe command exits with status 0.
Step 4: change the application
This is the situation the tool exists for: somebody changes the product, and nobody remembers which screenshots showed the part they changed.
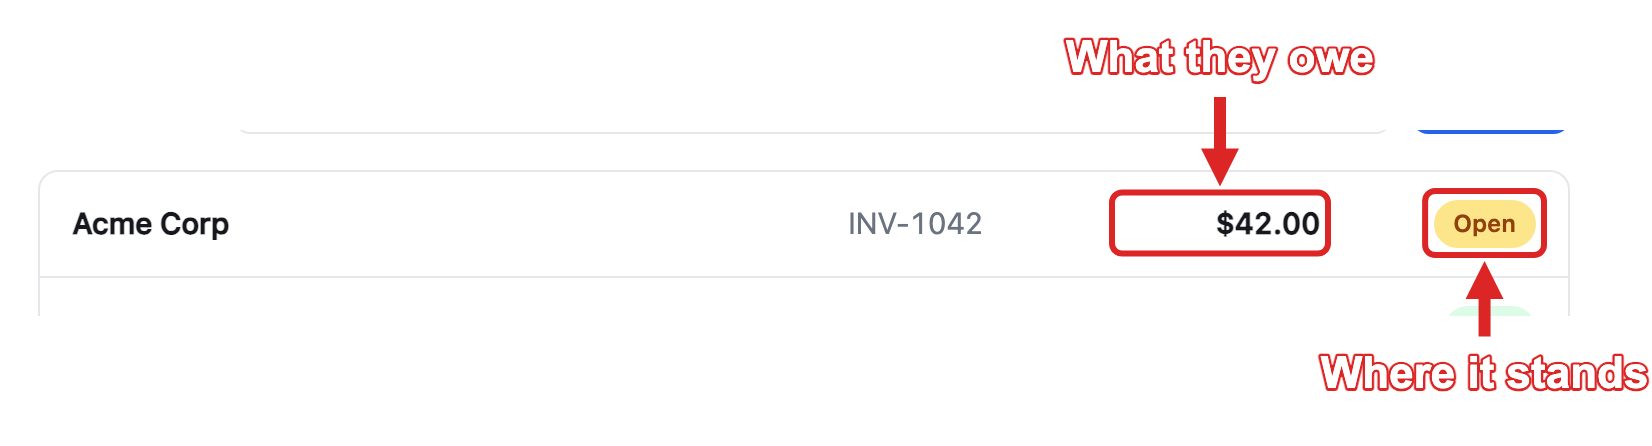
Open public/style.css and restyle the Open badge — the sort of change a designer makes without ever thinking about documentation:
.status-open {
  background: #fde68a;
  color: #92400e;
}
Reload the Orders screen to confirm the badge is now amber, then run the check again:
npx shotlist --checkThis time it reports a difference and exits non-zero:
  CHANGED  order-row — 0.60% of pixels differ
           committed: public/images/order-row.png
           re-shot:   screenshots/out/order-row.png
1 of 1 need attention
Your percentage will be close to this rather than identical, because text rendering differs between machines. Treat it as a prompt to look rather than as a verdict: a small percentage can be a serious change, and a large one can be a rendering difference that means nothing.
Why a smaller edit can report same
check.threshold is the fraction of pixels that must differ before a screenshot counts as changed, and it defaults to 0.002 — two pixels in every thousand. That is deliberate: without it, antialiasing noise would report a change on every run.
It also means small edits pass silently, and the effect is stronger than it looks: the image is larger than the region you clipped, because the canvas grew to hold the labels, so every change is a smaller fraction of it than you would guess from the row alone.
Restyling the badge moves about 0.6% of this screenshot — three times the threshold, which is why this step uses it. Changing a single character somewhere in the row moves roughly 0.05%, well under the limit, and is reported as same.
If your screenshots need to catch smaller changes than that, lower check.threshold in the configuration, or set it for one recipe under its own check key. See the recipe reference.
Step 5: look at what changed
npx shotlist --check --diff For every screenshot that moved, shotlist writes an image into screenshots/out/diff/ with three panels side by side: the published version, the one it just took, and the new one again with every changed pixel tinted.
Open screenshots/out/diff/order-row.png. Only the badge is lit up, which tells you the change is confined to the thing you restyled: the row did not move, and the callouts still point where they did.

Step 6: accept the change
You have looked at it and decided the new picture is the right one. Publishing it is step 2 again:
npx shotlist order-row --install Reload the documentation page: the screenshot in it now shows the amber badge. Run npx shotlist --check once more and it reports same.
That is the whole working loop: change the application, run --check, look at the diff, re-run with --install when the new picture is correct.
Step 7: meet a screenshot that can never pass
Not every difference is a change worth knowing about. The panel carries a "Cash collected this week" chart drawn from live figures, so it is different every time the page loads. Add a second recipe capturing the whole panel, in screenshots/recipes/orders-panel.yaml:
name: orders-panel
install: docs

clip: { css: '.panel', pad: 20 }
Publish it with npx shotlist orders-panel --install, then run npx shotlist --check twice in a row. The second run reports a change even though nobody touched anything:
CHANGED orders-panel — 1.60% of pixels differYour percentage will be a different number again, because the figures are different again. Left alone, this recipe reports a change forever, and a check that always fails is a check people stop reading.
The clock underneath the chart also changes on every capture, and it is worth knowing why it is not the problem here: a ticking digit moves a few hundred pixels of a two-million-pixel image, which is under the threshold from step 4. The chart moves tens of thousands, because its bars are solid fills. Size is what decides whether volatile content matters, not the fact that it is volatile.
shotlist gives you two ways out, and they answer different questions. Ask whether the region belongs in the picture at all:
-
check.ignorekeeps it in the screenshot and excuses only its contents from the comparison. maskpaints over it, so it is not in the screenshot at all.
The chart is part of the product this documentation describes, so a reader should see it. Excuse it from the comparison rather than painting it out:
name: orders-panel
install: docs

clip: { css: '.panel', pad: 20 }

check:
  ignore:
    - { within: clip, css: '#bars' }
Publish once more with --install, then run the check twice again. Both runs now report same, the chart is still in the published screenshot, and the rest of the panel is still being compared. The result says what it skipped — same orders-panel (1 region not compared) — so a pass is never read as covering the whole image.
Reach for mask when the region should not be in the picture in the first place: a customer's name, a face, a real account balance. It replaces the region with a flat fill, which is the right answer for a screenshot you are about to publish and the wrong one for a chart the documentation is about. Both are covered in Hide data that changes:
mask:
  - { within: clip, css: '#bars' }
Step 8: produce a report a machine can read
npx shotlist --check --json > report.json Everything meant for a person moves to standard error, so the file you just wrote contains only the report. Open report.json: it lists every recipe, its status, and how much of it changed.
What you have learned
- named a publication folder and installed a screenshot into a documentation page
- compared a live application against its published screenshots
- read a percentage difference and a three-panel diff image
- accepted a change by republishing
- excused a region that differs on every capture, without removing it from the picture
- produced a machine-readable report
Next steps
- Run shotlist in CI turns this loop into a pipeline job.
- Hide data that changes sets both tools side by side, along with turning the check off entirely, and covers what each one gives up.
- Why screenshots drift explains why the same page produces different pixels on a different machine.